Oven-roasting a split, spice-rubbed kosher turkey breast is one of my all time favorites. This simple recipe for split kosher turkey breast produces perfect results for any Wednesday night

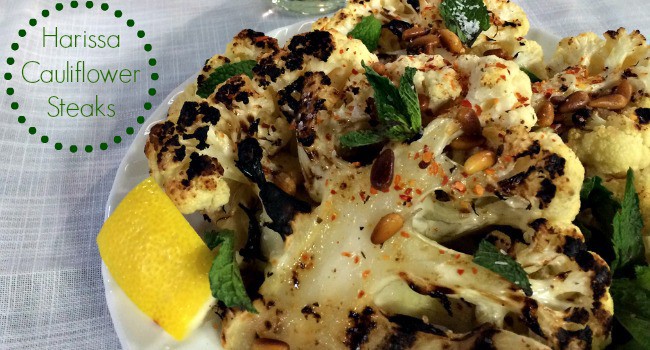
When you are serving vegetarian or want a tasty, light and healthy dinner, our harissa cauliflower steaks are always a huge hit!

A friend once called gluten: ‘Glue-tin’ and I took a moment to pause. On the days you want some lighter fare, this gluten-free tortellini with fresh tomato herb sauce is just the thing.
It’s a magic machine. Once I learned how to make Vitamix bolognaise sauce, pastas were healthier and meal prep twice as fast.
After eating these at a baby shower, I dubbed them the world’s best crabcakes. I quickly pulled out my cell phone to write down the ingredients as the baby’s grandmother named ingredients. I had to figure out the recipe myself……
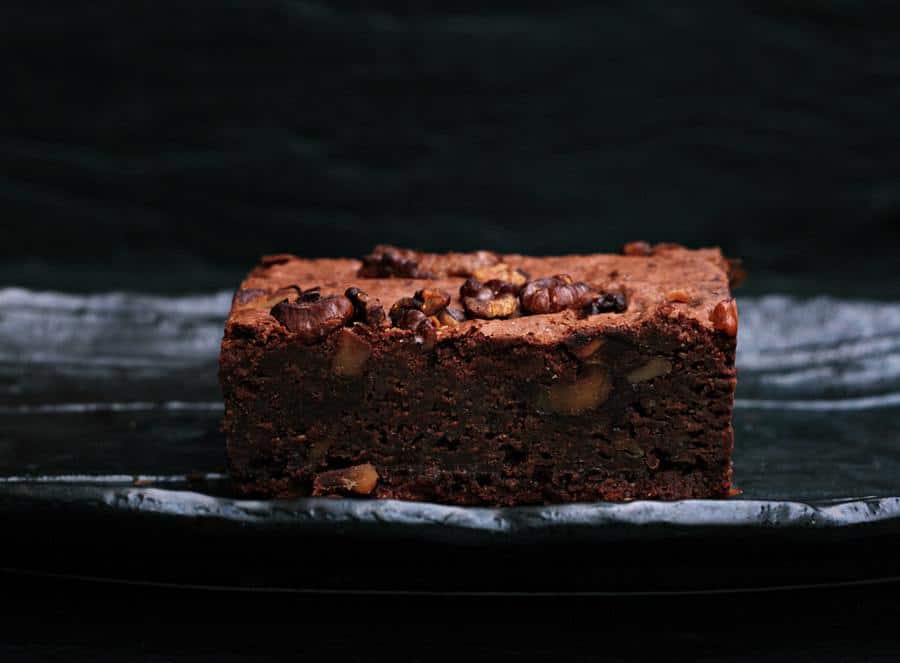
You’ll have no dessert guilt after indulging in these flourless sugar free chocolate brownies!
Ingredients:
· 1 (14 oz) can of
black beans, rinsed and drained
· 2 large eggs
· ½ cup cocoa powder
· ¾ cup Xyla
· ½ teaspoon oil
· 1 tablespoon milk
· 1 teaspoon balsamic vinegar
· ½ teaspoon baking powder
· ½ teaspoon baking soda
· ½ teaspoon of freshly ground coffee or instant coffee
· ½ cup semisweet chocolate chips (xylitol chocolate to make them completely sugar free, or omit chocolate and use all walnuts)
· ½ cup walnuts (or any nuts of your choice
Directions:
– Preheat the oven to 350° F. Line a 9 x 9-inch square baking pan with parchment paper, leaving a 2-inch overhang on all sides.
– Blend the black beans, eggs, cocoa powder, Xyla ® xylitol, oil, almond milk, balsamic, baking soda, baking powder and coffee in the blender until smooth and pour into a bowl. You can also do this all by hand if you don’t have a blender. Fold in chocolate chips and walnuts at the end. Pour the brownie batter into the prepared pan. You can also sprinkle some extra chocolate chips on top.
– Bake the brownies until a toothpick comes out clean, about 30 to 32 minutes. Allow the brownies to cool completely before slicing them into squares.
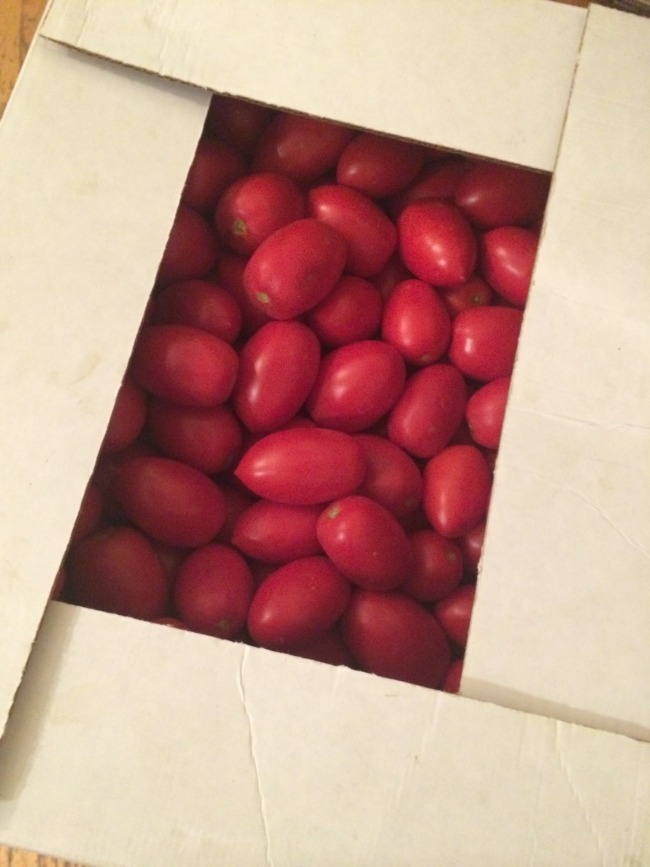
After my successful trip into British Columbia’s Okanagan region, I got the ‘bug’ to preserve and can all of the produce I possibly could. Because, well, zombie apocalypse. Or simple healthy organic food that doesn’t need refrigeration or freezing! The 90 pounds of roma tomatoes I purchased from Covert Farms yielded 16 1 litre jars of organic canned tomato sauce.
Organic Canned Tomato Sauce Ingredients:
35 to 46 lbs roma-style tomatoes
14 Tbsp bottled lemon juice
Salt
Sugar (optional)
Prepare the jars and lids:
Wash all jars and lids thoroughly with soap and water and rinse well. Fill your canner with enough water to cover the jars by at least 1 inch and bring to a simmer. Using a pair of canning tongs, lower the jars, lids and rings in gently. Boil for 4 minutes and remove with the tongs, placing them on a wooden cutting board.
Peel and core the tomatoes:
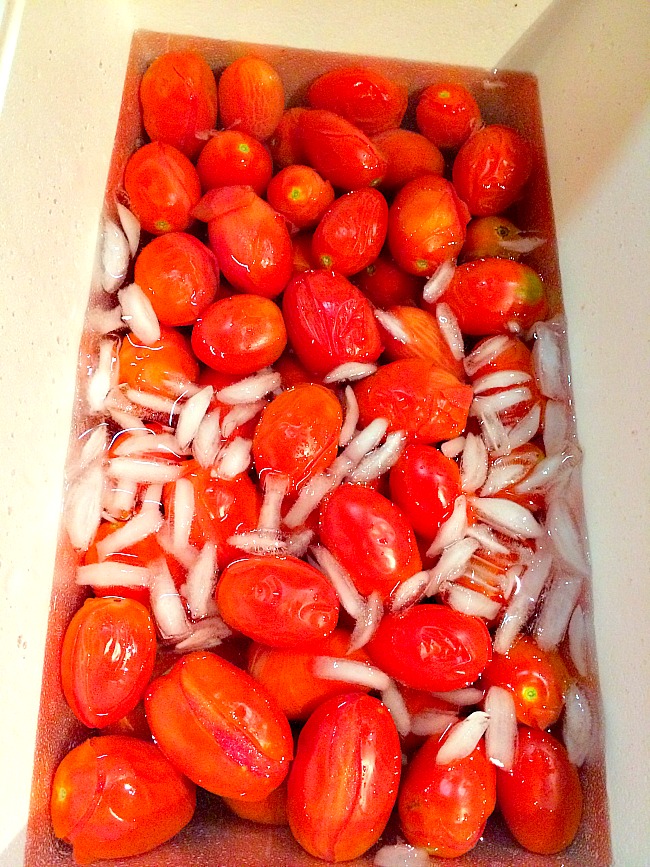
Bring a large pot of water to a boil. Have a large cooler of ice water at the ready. Gently lower the tomatoes into the boiling water and blanch them for 60 seconds. Remove with a strainer and transfer them to the ice water. Once cool, the skins should peel off easily. I reached into the cooler with sleeves rolled up and did this job with my hands, easily removing both the cores and skins.
Prepare the sauce:
Coarsely chop the tomatoes and add them to a large stockpot. Place stockpot over medium-high heat, crushing and stirring the tomatoes to keep from burning. Continue until all the tomatoes are added and crushed. Bring the tomatoes to a boil, then reduce heat and keep at a low boil. Reduce to the desired thickness, by a third for a thin sauce, or by half for a thick sauce. For a fine, smooth sauce you can blend in a Vitamix in batches.
Fill and close the jars:
Add two tablespoons of bottled lemon juice and one teaspoon of salt to each jar; add a teaspoon of sugar to offset the added acidity if desired. Use a ladle to pour the sauce into the jars through a canning funnel, leaving 1/2-inch headspace at the top. Run a clean chopstick around the inside of the jar to dislodge any trapped air. Wipe the rims of the jars with a damp paper towel. Place the lids on, and screw on the rings until just finger-tight.
Seal the jars:
Using canning tongs, gently transfer the jars to the canner, taking care to keep them vertical. When all the jars are in the canner, there should be at least 1 inch water covering them; if you need more, add water from the kettle until the jars are sufficiently covered. Bring the water to a full rolling boil, and process for 40 minutes.
Remove and cool:
Using canning tongs, gently remove the jars from the canner and transfer them to a kitchen towel or cooling rack, again keeping them vertical. Do not set hot jars directly on to cool counter surfaces. Leave to cool, undisturbed, for at least 12 hours. If any of the jars do not seal when cool, reprocess using the method above, or refrigerate and use immediately.
Label and store:
Add a label to the lid or side of your jar, noting the date it was canned. Remove the rings and store jars in a cool, dark place for up to one year. Refrigerate after opening.
 There’s a joke in my house about me not being a morning person. But it goes further than that. I’m so groggy in the morning that I probably should have padded walls in the hall and a bathrobe made of bubble wrap so that I don’t hurt myself on the way to the coffee maker. Unless I make it the night before I always measure wrong. One friend laughed and told me it was ‘simply’ the miles to kilometers ratio for portioning coffee to water. That didn’t help much.. If I had a few million dollars I wouldn’t hire a cleaning lady or a chef. I’d hire somebody to place my coffee beside the bed in the morning so that I could wake to the scent and avoid EMI – early morning injury.
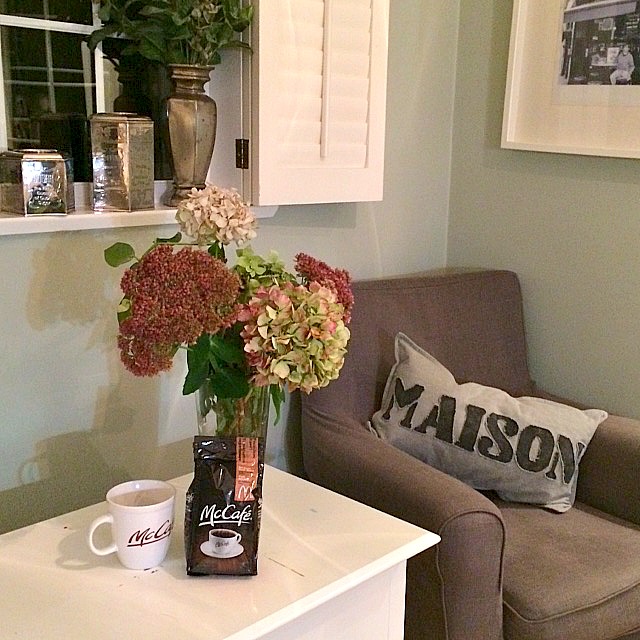 When McCafé first launched I had the opportunity as an all-access-mom to work behind the counter at a McDonald’s restaurant where I could act professional and run the barista machine. Incredible. Perfect every time (it was the machine), full of flavor and float-on-a-cloud aromas. I got slightly addicted. But then I ran into the issue of having to jump in my car in the morning in a half-awake state in order to reach the drive-thru for coffee. Not a wise move. The last time I tried I drove over my purse whilst backing up. I remember at university McDonald’s used to deliver to our residence. MMMM. Can you imagine fresh-brewed McCafé in the morning delivered all steamy and rich after you’ve been up all night writing a paper?
Though I still do a fair amount of last-minute writing, pigs can’t fly and I’m no longer in a university residence, but a thrilling coffee solution has fallen into my kitchen. McCafé is now sold in every major grocery retailer in Canada. To keep in your pantry! McCafé at HOME! In Canada, 65% of coffee is consumed in the home. I suspect that stat is about to go up… And if you have a fancy coffee maker you’re still golden – it comes in K-Cup, Tassimo T-Discs, or Ground. BOOM.
Now if McDonald’s could just teach my kids the miles to kilometers ratio…
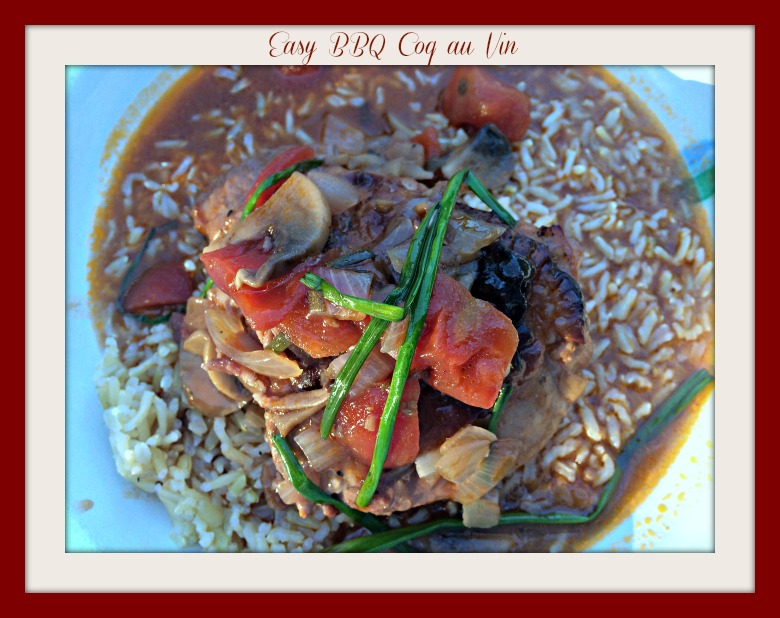 A favourite dish of mine from the time I was a small child, Coq au Vin has always been a labour of love. Asked to test the Clubhouse LaGrille Smokehouse Maple Marinade in a coq au vin recipe, I was elated!! Armed with bacon, chives, chicken and homemade stock, I was ready! And then I fell. And broke my wrist. Now the challenge was twofold – could I make a coq au vin that is not as labour-intensive as my age-old recipe? And could I manage it with only my dominant hand…
The answer to the second question became fairly apparent as my husband helped chop and lift my stunning Le Creuset pot to the stove. This recipe development experiment would be a family affair, and with my husband involved, it had to involve the grill! The recipe was adapted from the Clubhouse website, which allows you to print ideas in popular recipe book sizes using backgrounds you choose yourself. I was astonished at how simple and full of flavour the dish was, and I only added a few of my own ideas! It also had the added benefit of very easy clean-up facilitated by grilling the chicken on the BBQ.
All You Need for Easy BBQ Coq au Vin:
1 ½ lbs (750 g) chicken thighs
5 tbsp (75 mL) Club House La Grille Smokehouse Maple Rub Marinade, divided
2 slices bacon, chopped
1 cup (250 mL) each pearl onions and quartered mushrooms
1 cup (250 mL) no salt added diced tomatoes with juice
2 cups (500 mL) homemade Chicken Stock
1 cup (250 mL) red wine
2 tbsp (30 mL) Club House Rice Flour
2 tbsp chives
2 tbsp sage leaves
1 tbsp tomato paste

All You Do for Easy BBQ Coq au Vin:
1. In a medium bowl, combine chicken thighs with 3 tbsp (45 mL) rub marinade and marinate for 30 minutes.
2. On a medium heat grill, cook chicken thighs on both sides for 7 minutes making sure to obtain good grill marks and making sure not to burn chicken.
3. In a medium saucepan on high heat, sauté bacon, pearl onions and mushrooms for 2 minutes. Add remaining rub marinade, tomatoes, chicken stock and grilled chicken thighs.
4. Combine red wine and rice flour along with some of the liquid from the pot to make a roux. This will help you avoid lumps in your sauce. Add it to the above mixture and stir well. Bring to a boil, cover, remove from heat and place into a preheated 375°F (190°C) oven. Cook for 30 minutes, or until internal temperature of chicken reaches 165°F (74°C). *You could also assemble all of the ingredients in a slow cooker after grilling the chicken.
5. Serve over your favorite pasta or rice.
In all, we had a wildly successful dinner with very easy cleanup. The only problem was that there were no leftovers….
What are some of your favourite things to make on the grill? Share your stories with me on Twitter using the hashtag #FlavourStory!

Disclosure: This is a sponsored post made possible by Clubhouse La Grille. All images and opinions are our own.
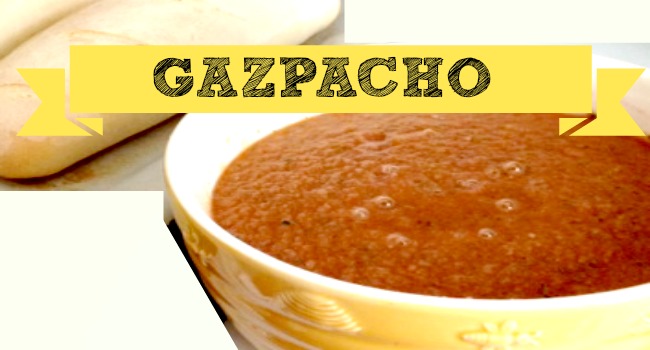 Gazpacho is an incredibly healthy and refreshing summer soup. If you happen to own a Vitamix it is even simpler! (And will save you some time to make mouth-watering fresh bread).
4 cups tomato juice
1 onion
1 green bell pepper
1 cucumber, seeds removed
2 cups chopped tomatoes (better if skins are removed, canned tomatoes can substitute)
2 green onions
3 tablespoons fresh lemon juice
2 tablespoons red wine vinegar
1 teaspoon dried basil
1 teaspoon dried tarragon
1/4 cup chopped fresh parsley
1 teaspoon sugar
salt and pepper to taste
Coarsely chop vegetables. Place all ingredients in a blender or food processor. Blend until well combined, but still a bit chunky. Chill at least two hours before serving.